Search This Blog

Monday, 12 July 2021

HOW TO GET WINDOWS 10'S FILE EXPLORER IN WINDOWS 11

How to Get Windows 10's File Explorer in Windows 11

The Windows 11 File Explorer has no ribbon and worse context menus.

There's a lot to like about Windows 11, but for many people the new design of File Explorer is a letdown. It has a similar layout to Windows 10's File Explorer and an identical layout and functionality, but there's no ribbon menu and many of the common menu items such as "view extensions" are buried in the options submenu. 


Even worse, the buttons for basic functions such as cut, paste and rename are only icons, with no tool tips or text on them to tell you what they do (presumably this is a bug). The jump lists you get when you right click on a folder may have fewer options too.

Fortunately, there's an easy way to get the old Windows 10 File Explorer back, complete with its ribbon and jump menus. You just need to edit the registry.


How to Restore the Windows 10 File Explorer to Windows 11

1.   Open Regedit. You can do this in Windows 11 by hitting Windows + R and entering regedit in the Run box or you can search for regedit using the Search feature. Click Yes if asked for permission by User Account Control.

2.   Navigate to HKEY_CURRENT_USER\Software\Microsoft\Windows\CurrentVersion\Explorer\Advanced

3.    Right click in the right window pane and select New->DWORD (32-bit) Value. A new entry appears with the name "New Value #" and a number.

4.    Rename your value to Separate Process. It must be spelled exactly this way.

5.    Open Separate Process by double clicking it and change the value to 1. Click Ok.

6.    Close Regedit and restart your PC.


Your computer should now show the classic Windows 10 File Explorer, though some of the icon designs may be a bit different. For example, the library folders in Windows 11 are in different colors, not just yellow. Overall, though, you're getting back the user experience and functionality you lost.


If you want to go back to Windows 11's File Explorer, just change the Separate Process value to 0 or erase the Separate Process key


Cheers!!!

Edited by AdeDanCompTech

HOW TO RESET YOUR CHROMEBOOK SO IT RUNS LIKE NEW

How to reset your Chromebook so it runs like new

Easily give your Chromebook a fresh, clean start in under a minute.

Resetting a Chromebook is a snap.

One of my favorite Chromebook features is how fast and easy it is to perform a factory reset. That might seem odd, but it’s a simple way to keep it running smoothly. Google calls the feature Powerwash and it can be done in under a minute. It’s also one of the features that make Chromebooks so good for sharing. Just Powerwash your Chromebook and someone else can use it and you won’t need to worry about them accessing your info.

Also, although Chromebooks are inherently secure, that doesn’t mean you can’t install a malfunctioning extension or a web app that misbehaves. Uninstalling the offending extension or app can typically fix the problem, but if that doesn’t work, a reset should do the trick. The same goes for other wonky behavior you may experience.

A Powerwash is a breeze to do, too. I’ve detailed the steps below. Also, while I included how to locate most settings by navigating menus, it is generally easier to use the built-in Launcher search feature to find exactly what you’re looking for fast. The Launcher can be opened by clicking the radial button at the far left on the shelf at the bottom of your screen; a two-finger swipe up from the shelf; or hitting the Search key.

Back up your files first

Since you’ll be wiping your Chromebook’s internal storage, you’ll want to back up any files you want to keep to the cloud or an external drive. This isn’t as painful as you might think because a lot of what you do on a Chromebook is already synced to your Google account – from apps and extensions to passwords and Wi-Fi networks. (To see what’s set up to sync, go to the Accounts section of the Settings menu. Click on Sync and Google services and select Manage what you sync.)

Back up files from your Files folder before you Powerwash your Chromebook.

What doesn’t automatically get synced are files saved locally to the Downloads folder. Linux and Play files are also stored locally. To see and back up those and any other files, open the Files app (or search for Files with the Launcher). The left-side navigation panel in Files shows you all your folders.

You’ll also see your Google Drive folder (that’s what I use for backups) as well as external storage. If your Chromebook has a microSD card slot, for example, you can save files to a card or attach an external drive. You can copy and paste files to Google Drive or external storage or just drag and drop them. The Powerwash only deletes what’s on your Chromebook’s built-in storage.

Give it a good scrub

A couple of clicks from a clean Chromebook.

Once your files are all backed up, you can start the Powerwash. Go to the Settings menu by clicking on the time on the far right side of the shelf at the bottom of your screen. That will pop up the quick settings panel. Click on the cog icon at the top of the panel.

Under the Advanced section at the bottom of the menu (you may need to click on Advanced to expand the options) you’ll find Reset settings and Powerwash. Click the Reset button and you’re on your way. You can also search for Powerwash with the Launcher or Search key to access it. And, if you aren’t or can’t sign in and want to Powerwash a Chromebook, press and hold Ctrl plus Alt plus Shift plus r to begin the reset.

There are a couple of warnings you’ll need to click through to confirm that you know what you’re about to do. After that, the Powerwash begins. And it is fast, too, generally taking less than a minute to complete. Also, if Chrome OS isn’t up to date or there’s a firmware update available for your Chromebook, it will ask if you want to install the updates.

Sign in and start working

When the Powerwash cycle completes, the Chromebook will restart and you’ll be greeted with the Welcome screen. Just follow the prompts to sign in to your Google account and you’re done. Anything you have set to sync will do so. That includes installing web and Android apps and browser extensions and any updates. Otherwise, the internal drive should be clean and your Chromebook running like new.


Cheers!!!

Edited by AdeDanCompTech

Sunday, 11 July 2021

NEW FEATURES IN MICROSOFT WINDOWS 11

New Features in Microsoft Windows 11

Recently, Microsoft released the Windows 11 build 22000.65, which many insider subscribers have upgraded their PC from Windows 10 to the latest version Windows 11. The stable version of Windows 11 is expected to come during the holiday period. So, many can wait to get their hands on this stable version or download the leaked version of the OS to see what has changed or added.


In this post, we shall take a look at the features and the changes it brings. We shall also talk about the benefits the new update brings for the users. In addition to this, you’ll be able to know the requirements for the update and other details related to the Windows 11 ISO 32/ 64 Bit upgrade.


Here are the new features to see in Windows 11

Brand new Start Menu, Taskbar Experience, Windows with rounded corners and Transparency.

New Themes and Widgets.

Snap Layout.

New Touch Keyboard, File Explorer Layout Update, Bloatware removed.

Auto HDR for Better Gaming.

Run Android Apps on your PC.

One Touch Teams Integration.

Better Performance. 

Some other changes on interface-level too such as:

>  New OOBE- Here, one can connect to a new network (WiFi), set up a new PIN, and sign up for a new Microsoft account.

>  Search Window and Centered Start Menu- Like the taskbar menu, the new Windows will have a centered Start Menu and Search Window. Also, you can align these as per your preference.

>  Action and Taskbar Center- You can see more show/ hide settings like Widgets, Task View, Desktop, and Search. This time, the icons will slightly rounded corners.

>  Task View- The designers have redesigned the Task View this time.

>  Snap Controls- In the new version, users can multitask easily with snap controls. You can snap windows in varied forms.

>  Widgets- The version provides widgets like weather updates, news at a glance, sports, etc.

>  New Icons, Wallpapers, and Sounds- When the user opens the File Explorer option, he will be able to notice several new icons, sounds, and wallpapers.

>  Emoji and Clipboard Panel- This time, the designers have combined the panels. On pressing Window Key+ Period Button, one can observe emojis, kaomoji, GIFs, symbols, and the history of the clipboard.

>  Terminal Window- This option can be accessed with the right click on the screen. This shows features like Unicode, multiple tabs, panes, UTF-8 character, custom themes, styles, etc.

>  Xbox and Microsoft Store- Users can see tighter integration in this version. Also, this version has app options.

Windows 11 Minimum Requirement

*  64-bit 1 Gigahertz with 2 or More core processor

*  >9 Degree HD Resolution 720p: screen resolution

*  4 Gb RAM or more than this

*  64 Gb hard disk space available 

Configuration:

*  4 Gb RAM or above

*  2.0 GHz dual-core processor

*  64 Gb hard disk space available

*  >9 Degree HD Resolution 720p: screen resolution


Cheers!!!

Edited by AdeDanCompTech

KNOWN ISSUES IN WINDOWS 11 BUILD 22000.65

Here are the known issues in Windows 11 build 22000.65

Here are the known issues in Windows 11 build 22000.65

It’s been over a week since the first Windows 11 build was released to Insiders, and today, we got the first update for it. Windows 11 build 22000.65 brings a few new changes, such as the taskbar now displaying on multiple monitors, but it also has some known issues. Of course, it does have a ton of fixes, such as for a stuttering animation when closing the notifications panel by clicking its icon. Still, these are things you want to know about before installing a build, just in case.

Thankfully, most of the bugs in this build aren’t major, but there are some weird ones. For example, if you try to move an app on the taskbar, it will launch or minimize as if you just clicked on it. If you’re looking forward to using the new File Explorer design, you may also notice that it’s not available if you’ve enabled the Open folders in a separate process option in the File Explorer settings. 

Here’s the full list of issues in Windows 11 build 22000.65:

Start: 

*   In some cases, you might be unable to enter text when using Search from Start or the Taskbar. If you experience the issue, press WIN + R on the keyboard to launch the Run dialog box, then close it.

Taskbar: 

* The Taskbar will sometimes flicker when switching input methods.

* Dragging an app icon to rearrange it in the Taskbar will result in the app launching or minimizing.

Settings: 

*  When launching the Settings app, a brief green flash may appear.

*   When using Quick Settings to modify Accessibility settings, the settings UI may not save the selected state.

File Explorer: 

*  The new command bar may not appear when “Open folders in a separate process” is enabled under File Explorer Options > View.

*  Explorer.exe crashes in a loop for Insiders using the Turkish display language when battery charge is at 100%.

*  When right clicking the desktop or File Explorer, the resulting context menu and submenus may appear partially off screen.

Search: 

*   After clicking the Search icon on the Taskbar, the Search panel may not open. If this occurs, restart the “Windows Explorer” process, and open the search panel again.

*   When you hover your mouse over the Search icon on the Taskbar, recent searches may not be displayed. To work around the issue, restart your PC.

*  Search panel might appear as black and not display any content below the search box.

Widgets: 

*  Widgets board may appear empty. To work around the issue, you can sign out and then sign back in again.

*  Launching links from the widgets board may not invoke apps to the foreground.

*   When using the Outlook client with a Microsoft account, Calendar, and To Do changes may not sync to the widgets in real time.

*  Widgets may be displayed in the wrong size on external monitors. If you encounter this, you can launch the widgets via touch or WIN + W shortcut on your actual PC display first and then launch on your secondary monitors.

*  After adding multiple widgets quickly from the widgets settings, some of the widgets may not be visible on the board.

Store: 

* The install button might not be functional yet in some limited scenarios.

*   Rating and reviews are not available for some apps.

Windows Security:

*  Device Security is unexpectedly saying “Standard hardware security not supported” for Insiders with supported hardware.

*  “Automatic sample submission” is unexpectedly turned off when you restart your PC. 

Looking through the list, other notable issues in Windows 11 build 22000.65 include the install button not working on the Microsoft Store. Of course, that may not be as concerning as the fact that Android apps still aren’t available. That’s one feature many are probably looking forward to, but it’s not ready yet. 

Of course, some problems are to be expected when running unfinished software. In fact, Microsoft recently announced a new Bug Bash. This is an event where Microsoft publishes a series of quests in the Feedback Hub app. Windows Insiders can fulfill these quests and file any issues they find to help Microsoft polish up the operating system. 

Windows 11 is going to be released to the masses this holiday season, so there’s still time for all those fixes to be implemented. For now, Windows Insiders can already experiment with a lot of new features and changes. If you want to join the fun, you can read our guide on joining the Insider Program.


Cheers!!! 

Edited by AdeDanCompTech
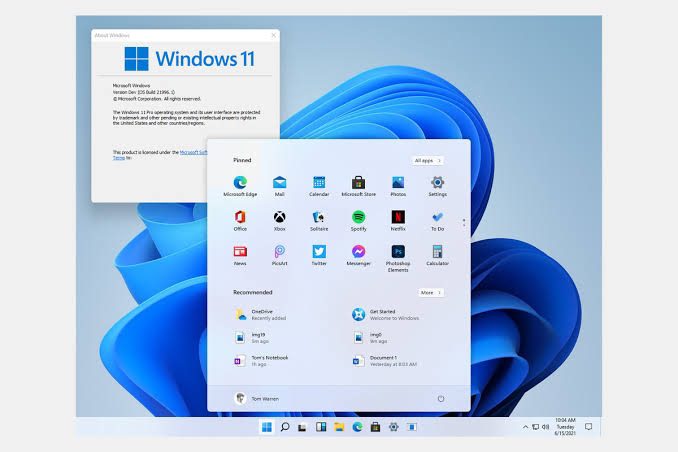
Saturday, 10 July 2021

LINUX MINT 20.2 NOW AVAILABLE WITH NEW FEATURES

Now Available with New Features and Tools: Linux Mint 20.2

Linux Mint 20.2 is an exciting upgrade with new applications, update reminders, and desktop environment upgrades. It's time to upgrade?


Linux Mint 20.2 beta arrived a few weeks ago. And now, the final stable release for Linux Mint 20.2 is here. 

This release is an LTS upgrade based on Ubuntu 20.04 that is supported until 2025. 

Let us take a quick look at what’s new with this release and how do you get it.

Linux Mint 20.2: What’s New?

The key highlight of this release is the addition of update notification, which should encourage more users to keep their systems up-to-date to ensure best security. 

It will not force updates like Windows, but it will keep an eye out for how long you don’t apply updates, check system’s uptime, and then prompt you with an update reminder notification. 


You also get to configure the update notifications, which is great. 

Other major upgrades include Cinnamon 5 desktop environment, a new bulk file renaming tool (Bulky), and Sticky Notes replacing GNote as the default note application. 


The file renaming tool is available for all the desktop editions, excluding Xfce, because its default file manager (Thunar) already supports the feature. 

Cinnamon 5 is not exactly exciting, but there are some under-the-hood improvements to its performance and nice little option to limit its RAM usage. 


And Sticky Notes is developed in GTK 3, supports HiDPI and offers more features, along with better integration with the system tray. 


Other Improvements

Warpinator app to share files across a network has received some upgrades making it more useful. 

Other desktop environment upgrades include Xfce 4.16 and MATE 1.24. In addition to that, you will find certain subtle UI improvements and several bug fixes. 

Especially addressing issues with NVIDIA graphics, along with the support for hybrid graphics, great news for Laptop users! 

To know more about some of the detailed changes, you can refer to the official announcement for one of the desktop editions. 

Download or Upgrade to Linux Mint 20.2

You can find the stable releases directly from the official website’s download page. 

If you have Linux Mint 20 or 20.1 installed, you can choose to first apply all the available updates and then an update to your Update Manager. 

Next, make sure that you have a backup (use timeshift if you want) and then head to the Update Manager’s System Upgrade option from the Edit menu as shown below. 


When you click on it, you will be greeted with the on-screen instructions to go ahead with the upgrade. You may also refer to the official upgrade instructions for further help.

Have you upgraded yet? What do you think about the latest release? Feel free to share your thoughts in the comments down below. 


Cheers!!! 

Edited by AdeDanCompTech

UPGRADING WINDOWS 11 HOME EDITION TO WINDOWS 11 PROFESSIONAL EDITION

How to upgrade from Windows 11 Home to Pro

When Windows 11 arrives later this year, it will come in a few different editions. Just like with previous Windows versions, different editions contain certain different features, which make the operating system more tailored for different users. For the general public, there are two main editions you’ll find — Windows 11 Home and Windows 11 Pro. As the name suggests, Windows 11 Pro is the more feature-rich edition, but most laptops come with the Home edition. Even Microsoft’s own Surface devices come with Windows 10 Home, with the exception of the Surface Pro 7+. In this guide, we’ll show you how to upgrade from Windows 11 Home to Pro, and why you might want to. 

If you’re looking to learn a bit more about different editions, you can check out our article about Windows 11 SKUs. In addition to Home and Pro, there are numerous editions for business and education users. There are also specific editions for different kinds of devices. 

Why should you want Windows 11 Pro?

As we mentioned, Windows 11 Pro contains certain features that the Home edition doesn’t have, but what exactly are you missing? Well, for most users, you’re probably just fine with Windows 11 Home. As the name suggests, the features in the Pro edition are more geared towards professionals and enterprise-managed PCs. Still, there are valid reasons to want it. 

One of the Pro-exclusive features is BitLocker encryption, which helps protect the data on your PC from external attackers. Encrypting your data means only you can access it, and that’s important if you’re worried about data privacy and security. 

Another exclusive feature is support for Remote Desktop. This lets you remotely connect to your PC and control it from anywhere, which can be very useful for PCs you leave at the office, for example. There’s also support for Hyper-V virtualization. This lets you create and run virtual machines, so you can test specific environments or risky software without damaging your host PC. 

However, it’s worth noting there are a few apps that offer similar tools if you have Windows 11 Home. VMware Workstation Player is an example of an app for running virtual machines, and TeamViewer is good for accessing remote PCs.  You don’t need the Pro edition necessarily. 

More niche features for Pro include the ability to join Azure Active Directory or a business domain. You may also like that you can set up Windows 11 Pro with a local account right away, although you can also do that on Windows 11 Home with some trickery. We have a guide on how to do just that if you’re interested. 

How to upgrade

If you’re set on upgrading from Windows 11 Home to Pro, here’s what you need to do:

>   Open the Settings app and choose Activation.


>   Expand the Upgrade your edition of Windows section to see your options. If you want to buy an upgrade to Windows 11 Pro, click Open Store.


>   You’ll see a feature comparison between Home and Pro editions of Windows with the option to buy the upgrade. The screenshot below still shows Windows 10, since Windows 11 hasn’t officially released yet.

>   Click Buy to get the new license. If you have Windows 11 Home, the upgrade should cost $99.


>   You’ll need to enter your password and fill in your billing details if you haven’t already.


>   Once you buy and apply the upgrade, your PC has to restart to enable the new features. If you already have a product key for Windows 11 Pro, you can click Change next to Change product key.


>   You’ll be asked for administrator permission to run the Windows Activation tool, then you can enter your Windows 11 Pro product key.


>   Once the key is validated, you’ll need to restart your PC to enable the Pro features. 

Windows 11 Home and Pro are actually based on the same installation files, so you don’t have to reinstall Windows or anything to upgrade. A simple restart will configure your version of Windows, and you’ll be good to go the next time you use your PC. 

If you’re looking to buy a new Windows laptop that can upgrade to Windows 11 later this year, you can go for 8th or more generation PCs. Most of them are running Windows 10 Home, which means you’ll also get Windows 11 Home when you get the update. The Lenovo ThinkPad X1 Carbon Gen 9 would be an exception, since it ships with Windows 10 Pro and will get Windows 11 Pro after the update.


Cheers!!!


Edited by AdeDanCompTech

Source: XDA Developers

You need to enable Secure Boot to install Windows 11 — here’s how.

You need to enable Secure Boot to install Windows 11 — here’s how. Windows 11 requires Secure Boot to run, and here are the steps to che...